How to Get the Faydown Cloak (Double Jump) in Hollow Knight: Silksong
The double jump waits at the frozen summit of Mount Fay. Here's how to reach the mountain, survive the cold and claim the Faydown Cloak.

A second jump changes everything in a platformer, and Silksong makes you work hard for it. The Faydown Cloak gives Hornet a mid-air double jump, and it also makes her immune to the freezing winds of the mountain where you find it. The catch: that mountain is Mount Fay, a long, icy platforming gauntlet with almost no enemies and a cold that slowly chips away at your health.
This guide covers how to reach Mount Fay, how to handle the climb, and what to do at the summit. It's correct for the current version of the game, Patch 5 (1.0.30000). The free Sea of Sorrow expansion has been announced for 2026 but hadn't launched as of late October, so nothing here has changed since March.
What you need
| When | Act 2 |
| Required ability | Clawline (from the Cauldron in the Underworks) |
| Also used | Drifter's Cloak, Cling Grip, Swift Step, Needolin |
| Area | Mount Fay, reached through The Slab |
| Rosaries to bring | About 100 (40 for the map, 60 for a toll bench) |
| Reward | Faydown Cloak: double jump and immunity to the cold |
Clawline is the hard requirement. Mount Fay's gaps are built around grappling to rings and enemies, so get it first. Our Clawline guide covers the White Key route to the Cauldron.
The toll bench used to cost 90 Rosaries at launch, but Patch 1 dropped it to 60, so older guides may list the higher price.
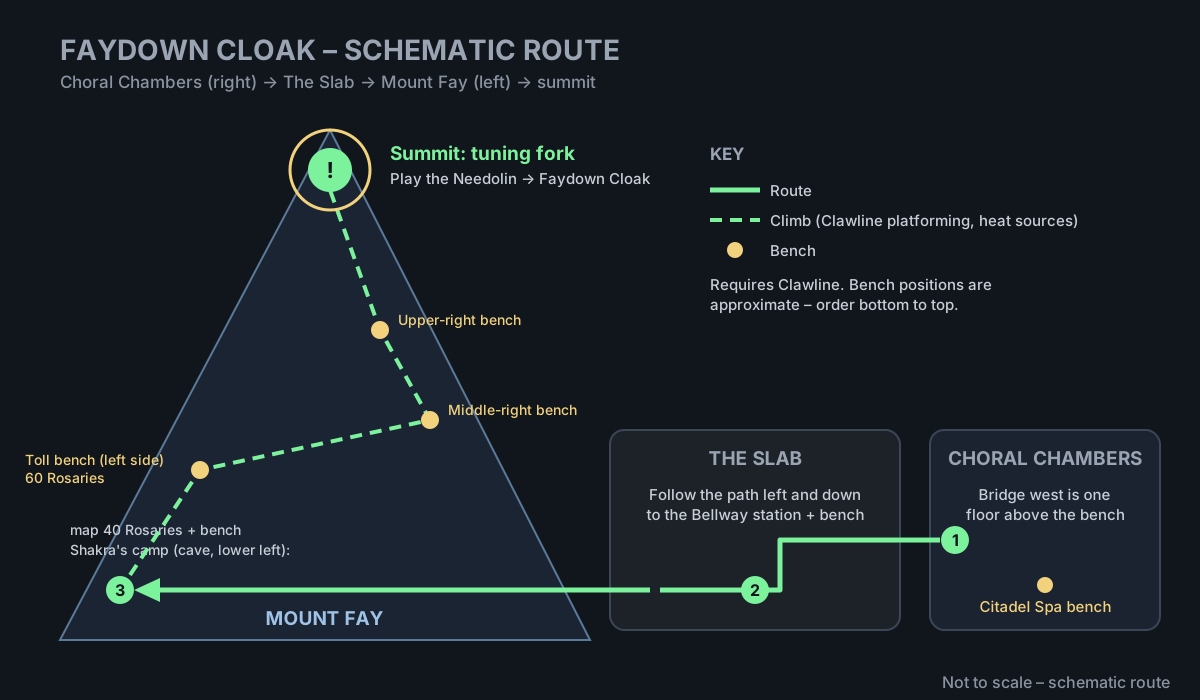
Step 1: Get to The Slab
How you enter The Slab depends on how Act 1 went.
- If you were captured and escaped the prison in Act 1, you already know the way. Head for the Bellway station in the south of The Slab.
- If you avoided capture, go to the Choral Chambers in the Citadel. Look for the bridge on the west (left) side, one floor above the Citadel Spa bench, and cross it into The Slab.
- Coming in this way only lets you follow a direct path. Go left and down until you reach the Bellway station and a bench. That's all you need for now.
Step 2: Enter Mount Fay and meet Shakra
- Continue west past the Bellway station. The terrain turns to snow and ice, and you're now on Mount Fay.
- Use Clawline to cross to the cave in the bottom left. Inside, the mapmaker Shakra has set up camp by a fire.
- Buy the Mount Fay map for 40 Rosaries and rest at her camp bench. This is your first checkpoint.
Step 3: Learn how the cold works
Until you have the Faydown Cloak, Mount Fay's air freezes Hornet. Away from heat, she starts flashing blue, ice creeps over the edges of the screen, and your masks turn blue. After a short grace period, you start losing health steadily.
- Glowing lamps and fires are your safe zones. Standing near one stops the freeze and resets it.
- Plan each section from heat source to heat source. Don't explore while the timer is running. Get to the next lamp first, then look around.
- Icy water hurts immediately. Falling in costs a mask, and the Faydown Cloak doesn't protect you from it later either.
Step 4: Climb the mountain
The climb mixes almost every movement tool you have: pogo strikes, wall clinging, gliding, dashing and plenty of Clawline. There are few enemies, and the ones you meet are mostly there as grapple or bounce targets.
- Unlock the toll bench on the left side of the mountain for 60 Rosaries. It's worth every bead on a climb this long.
- Work upward to the middle-right bench, then the upper-right bench. One of them is tucked behind a breakable wall, so strike any wall that looks suspicious near a heat source.
- Rest at every bench you find. A death sends you back to the last one, and you don't want to redo a full section.
- Keep climbing until you reach the peak, where a large tuning fork stands.
Step 5: Play the Needolin at the summit
- Walk up to the tuning fork at the top of Mount Fay.
- Play the Needolin next to it.
- A huge feathered creature, the Fayforn, swoops down. After the cutscene, Hornet's cloak is lined with its down and becomes the Faydown Cloak.
From now on, press Jump in mid-air to jump a second time. The cold no longer hurts you anywhere on the mountain, which makes the trip back down far more relaxed.
How the double jump works
- You get one extra jump per airtime. It refreshes when you land, cling to a wall, pogo off something, hit a ring or bounceable target with Clawline, or ride an updraft.
- Gliding comes after the double jump. With the Drifter's Cloak, Hornet has to use her extra jump before she can float.
- It upgrades your old cloak. The Faydown Cloak replaces the Drifter's Cloak in your inventory, so you don't lose the glide.
Tips
- Tools can buy you time. Weavelight, Flintslate, Ascendant's Grip and Plasmium Phial can all make the climb easier, though none is required. Ascendant's Grip lets you cling to walls longer, which helps on the tall vertical shafts.
- Let Clawline finish its pull. If you jump or dash too early during a grapple bounce, you cut it short and often fall. Wait for the bounce to peak first.
- Keep Silk in reserve. Every Clawline throw costs Silk. Hit enemies near heat sources to refill, then move on.
- Explore after the summit. With the cold gone, the Mask Maker's home on the western slopes becomes reachable, along with other side paths you skipped on the way up.
Common mistakes
- Coming without Clawline. Players have reached the top without it using specific tools, but it's an exhausting trick. For a normal run, get Clawline first.
- Skipping the toll bench to save Rosaries. Sixty Rosaries is cheap compared with replaying half the mountain after every fall.
- Exploring while freezing. Side rooms can wait. Reach the next lamp, reset the cold, then explore.
- Forgetting the Needolin. Reaching the peak isn't enough. You have to play the Needolin by the tuning fork for the Fayforn to appear.
More Hollow Knight: Silksong

Sources
This article was written by AI (Claude) and checked against the sources above. Games are updated regularly, so details may change.