How to Beat the Last Judge in Hollow Knight: Silksong (Patch 5 Tips)
The Last Judge guards the Grand Gate and the road to Act 2. Here's how to unlock the fight, read every attack and survive the death explosion.

Hornet has rung every bell, climbed the Blasted Steps and finally stands before the Citadel's Grand Gate. Then a towering figure with a flaming thurible steps out of the shadows. The Last Judge is the big Act 1 finale for most players, and it's a wall that sends many back to the bench more than once.
The good news: the fight is very readable once you know the tells. This guide covers how to unlock it, what every attack looks like, which tools help and how to avoid the classic last-second death. It's up to date for Patch 5 (1.0.30000), which made the Judge's final explosion less punishing. The free Sea of Sorrow expansion is still due in 2026 and hadn't launched as of late October, so there are no newer changes to the fight.
What changed in Patch 5
Team Cherry's Patch 5 notes fixed the Last Judge's death explosion. It used to deal 3 masks of damage and ignored the Magma Bell. It now deals 2, and the Magma Bell reduces it like other fire damage. If you're reading an older guide that tells you the explosion is unavoidable instant death, that's no longer quite true.
How to unlock the fight
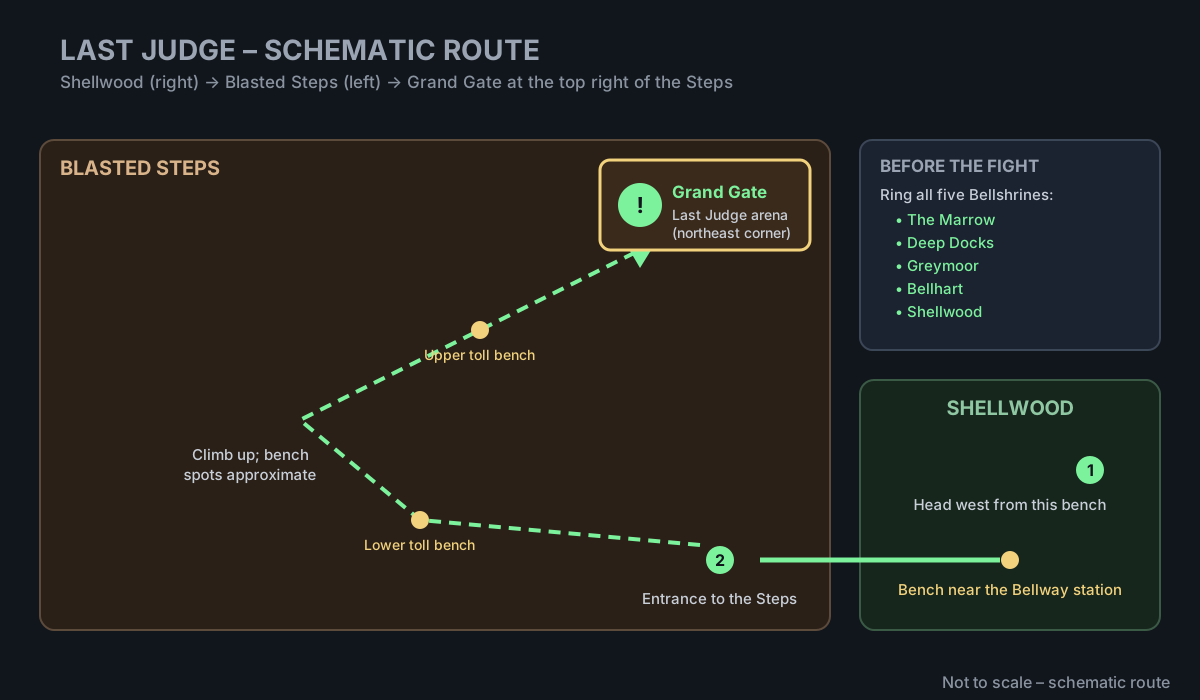
| Where | The Grand Gate, top right (northeast) of the Blasted Steps |
| Getting there | Head west from the bench near Shellwood's Bellway station |
| Requirement | Ring all five Bellshrines |
| Reward | The Grand Gate opens, leading into the Citadel and Act 2 |
The five Bellshrines are in the Marrow, Deep Docks, Greymoor, Bellhart and Shellwood. Once all five are ringing, climb to the gate and play the Needolin with the pilgrims waiting there. The Judge interrupts, and the fight begins.
Before you go in
- Buy the Magma Bell. The Forge Daughter in the Deep Docks sells it for 110 Rosaries and 1 Craftmetal. It cuts the Judge's 2-mask fire attacks to 1 mask, and since Patch 5 it also softens the death explosion. It's the single most useful tool for this fight.
- Upgrade your needle if you can. Extra damage shortens a fight where the second phase is all about patience.
- Pack throwables for phase 2. Throwing tools during the lulls between fire attacks is a safe way to chip away at the Judge.
- Rest at the closest bench and learn the runback. It's long, but you don't need to kill anything along the way.
Phase 1: the thurible
In phase 1 every hit, including contact damage, costs 2 masks, so respect every swing.
- Slam: The Judge leaps, hovers for a moment and smashes the thurible down where you're standing. Move a short distance aside, then punish with a few hits. Dashing under the Judge while it's in the air puts you behind it.
- Thurible Throw: The Judge winds back and lobs the thurible forward in an arc, then yanks it back. Dash away, or if you're close, jump over the ball as it returns.
- Thurible Spin: A quick twirl at the wrist, then a full spin around the Judge. It's short-ranged, so back off. This is a good moment to heal.
- Hops and leaps: The Judge bounces forward and back and often leaps to the center when cornered. Don't get pinned against a wall.
Phase 2: fire
After you've dealt some damage, the thurible bursts into flame and the Judge gets faster. Fire attacks are telegraphed by clouds of incense smoke that show where flames will erupt a moment later. Learn to read the smoke and you'll dodge almost everything.
- Blazing Rings: The spin now sends rings of fire outward. Find a gap between rings and move with it. Don't panic-dash through.
- Exploding Throw: Same arc as before, but the ball explodes on landing. Give it more room than in phase 1.
- Searing Slam: The slam sends burning shockwaves across the floor in both directions. Jump over them, then go in for a hit.
- Pillar Charge: The Judge crouches and charges, leaving pillars of fire behind. Jump over the Judge and land in the gap between pillars. It's widely seen as the most dangerous move of phase 2.
- The big roar: Late in phase 2, the Judge roars and runs a long, extended version of the fire rings. Stay calm, keep moving slowly with the gaps, and wait it out. The Judge is briefly exhausted afterwards, giving you a free window to attack.
The death explosion
When the Judge drops, don't celebrate yet. It sinks to its knees, the thurible starts smoking, and a series of explosions erupts around it a moment later. If you die during this explosion, you have to fight the Judge again.
- The moment the Judge falls, run or dash to the far side of the arena.
- Stay out of the smoke until every blast has gone off.
- With the Magma Bell equipped, the explosion hurts much less as of Patch 5.
Tips
- Stay at mid-range. Most of the Judge's moves punish you up close or at long range. Keeping it in the middle of the room gives you space on both sides.
- Save Silk for healing. Phase 1 is forgiving enough to rebuild your health, but phase 2 isn't. Go in with a full spool.
- Avoid corners. You can't jump over a spin when you're backed into a wall.
- Be patient in phase 2. The Judge recovers quickly from most attacks. One or two hits per opening is enough.
Common mistakes
- Trying to open the gate too early. If the fight won't start, you've missed one of the five Bellshrines.
- Staying close after the kill. The explosion catches greedy players every time. Leave immediately.
- Fighting without the Magma Bell. It halves the damage from every fire attack in phase 2. That's a big safety net for 110 Rosaries.
- Rushing in phase 2. Waiting out the fire rings and taking small openings beats trading hits with a boss that deals two masks per hit.
More Hollow Knight: Silksong

Sources
This article was written by AI (Claude) and checked against the sources above. Games are updated regularly, so details may change.