How to Get the Blood of Lathander in Baldur's Gate 3: Dawnmaster's Crest and Rosymorn Monastery Guide
Solve the Dawnmasters' weapon puzzle, grab the Dawnmaster's Crest and take the legendary Blood of Lathander mace without blowing up the githyanki crèche.

The Blood of Lathander is one of the best weapons you can pick up in Act 1 of Baldur's Gate 3 – and one of the easiest to miss. It's a legendary +3 mace hidden under Rosymorn Monastery, and the game gives you two ways to take it: a clean one that needs the Dawnmaster's Crest, and a messy one that triggers a holy trap capable of wiping out an entire githyanki crèche.
This guide covers the clean route, step by step, plus what to do if you grab the mace without the crest.
What the Blood of Lathander does
| Stat | Value |
|---|---|
| Type | Legendary +3 Mace (one-handed) |
| Damage | 1d6 + 3 bludgeoning (+ Strength) |
| Sunbeam | Cast once per long rest as a level 6 spell |
| Lathander's Blessing | Once per long rest, at 0 HP you heal 2d6 and nearby allies heal 1d6 |
| Lathander's Light | 6 m light; fiends and undead in it must pass a DC 14 Constitution save or be Blinded |
That last property is the star. Blinding undead in a radius is huge in Act 2, where the Shadow-Cursed Lands are full of them, and the light also dispels the Shadow Curse around you. Clerics, Paladins and anyone else proficient with maces will get the most out of it.
Requirements
- Take the Mountain Pass route. Rosymorn Monastery sits on the Rosymorn Monastery Trail, reached from the Mountain Pass. If you go through the Underdark instead, you'll skip it. There's a Rosymorn Monastery waypoint nearby.
- Some way to deal with eagles and a Guardian of Faith. Fights are optional, but expect at least one.
- Optional: Lae'zel in the party makes getting into the crèche much smoother.
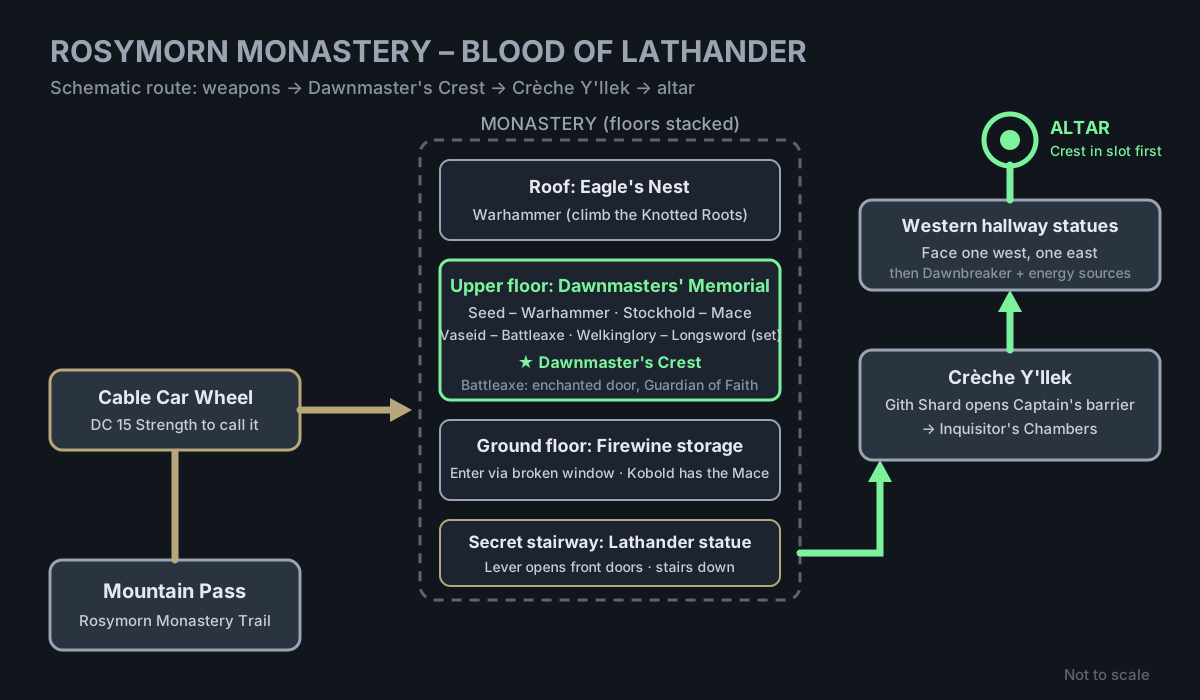
Step 1: Get into Rosymorn Monastery
- Follow the Rosymorn Monastery Trail to the Cable Car Wheel and pass a DC 15 Strength check to call the cable car. Ride it over.
- Head east until a cutscene shows githyanki shooting down a group of cultists.
- The front doors are magically sealed. Climb in through the broken windows just west of them instead.
- Inside the Firewine storage you'll meet a group of drunk kobolds. One of them carries the Ceremonial Mace – loot it, and the quest "Find the Blood of Lathander" kicks off.
Step 2: Collect the ceremonial weapons
The puzzle needs a mace, a warhammer and a battleaxe. The ceremonial versions are the intended solution, but any weapon of the right type works – handy if a fight goes badly.
- Mace: from the kobold above. The Rusty Mace at Dawnmaster Stockhold's grave also counts.
- Battleaxe: climb up through the big crack in the wall to the roof and find the enchanted door to the southeast (DC 15 Sleight of Hand to open), or smash the weak wall just south of it with bludgeoning or force damage. The axe lies under a Guardian of Faith, which attacks the moment you pick it up.
- Warhammer: on the very top, in a giant eagle's nest. Climb the Knotted Roots to get there. The eagles warn you off – a DC 18 Animal Handling check (or Speak with Animals and a Persuasion check) buys you a peaceful approach, but they'll still attack if you get too close. Fog Cloud or Darkness plus Invisibility lets you sneak in; otherwise, fight them.
Step 3: Solve the Dawnmasters' puzzle and get the crest
The puzzle room is the Dawnmasters' Memorial on the upper floor, with a stained-glass floor and four stone altars. One altar, Dawnmaster Welkinglory's, already holds a glowing Ceremonial Longsword. Leave it where it is.
Drop or throw the other three weapons onto these altars:
| Altar | Weapon |
|---|---|
| Dawnmaster Seed | Warhammer |
| Dawnmaster Stockhold | Mace |
| Dawnmaster Vaseid | Battleaxe |
Vaseid's stained-glass panel is too broken to read. That's why his book, The Parables of Dawnmaster Vaseid, is hidden in the Gremishka den nearby, but you can also work it out by elimination. Put a weapon on the wrong altar and it bounces back, sometimes knocking you prone.
Get all three right and a hidden compartment opens with the Dawnmaster's Crest and a note. Your whole party also gets the Morninglord's Radiance buff.
Shortcut: a DC 10 passive Perception check spots the compartment, and a DC 30 Sleight of Hand check opens it without solving the puzzle. You'll miss the buff, though.
Step 4: Reach the secret chamber under the crèche
- From the memorial, head south and jump the gap toward the enchanted-door area, then take the crumbling stairs down.
- Break the barricade on the western wall, go through the oak door and past the statue of Lathander.
- Pull the lever near the statue to open the front doors (useful for coming back), and read the plaque, Holy Blood of Lathander.
- Take the stairs down into Crèche Y'llek. The githyanki don't trust outsiders: bring Lae'zel, or talk your way past the guards with Persuasion, Intimidation or Deception.
- A barrier blocks the Captain's Chambers. You need a Gith Shard from Kith'rak Therezzyn – steal it, fight for it, or show her and the Inquisitor the artefact you carry.
- In the Inquisitor's Chambers, head straight for the western hallway. Rotate the two statues so the southern one faces west and the northern one faces east. The southern statue needs a DC 25 Athletics check; if it sticks, coat it in Grease or hit it.
- Past the hidden door, a Dawnbreaker fires pulses that knock you back. Disarm it (DC 14 Sleight of Hand), then destroy the energy sources powering the light barriers. Magic Missile or a flying summon like Spiritual Weapon can hit them without any climbing.
Step 5: Take the mace – the right way
At the altar, put the Dawnmaster's Crest in the item slot first, then take the Blood of Lathander. That's it: no trap, no war with the crèche, and the biggest XP reward of the quest. Stealing the mace from beneath the monastery also unlocks the Taking Blood achievement.
If you take it without the crest
Grabbing the mace without the crest sets off the monastery's last defense:
- The character holding the mace gets locked in a forcefield. Misty Step or Dimension Door gets them out, or destroy the energy source powering it.
- The githyanki turn hostile.
- You have four turns to escape or destroy the four Lathander Solar Machines. Use spells – they resist piercing damage.
- Destroy all four and the crèche survives. Fail, and the blast wipes it out.
Common mistakes
- Taking the Underdark route. You'll never see the monastery. Go over the Mountain Pass.
- Moving Welkinglory's longsword. It's already in the right place.
- Fighting the Inquisitor by accident. Walk straight to the western hallway instead of picking a fight in the Inquisitor's Chambers.
- Skipping the crest. The forceful route is fun to watch, but it's a chaotic fight on a four-turn clock.
More Baldur's Gate 3
-
 How to Get Markoheshkir in Baldur's Gate 3: Ramazith's Tower Puzzle and Hidden Levers7 Nov
-
How to Get the Helldusk Armour in Baldur's Gate 3: House of Hope Heist and Raphael Fight Guide31 Oct
-
How to Get Nyrulna in Baldur's Gate 3: Winning Akabi's Jackpot and the Hidden Jungle Chest30 Oct
-
How to Get Phalar Aluve in Baldur's Gate 3: Sword in the Stone Location in the Underdark9 Oct
Sources
This article was written by AI (Claude) and checked against the sources above. Games are updated regularly, so details may change.