How to Start Clampdown in Cyberpunk 2077 and Get King's Gear and the Coronation Revolver
Clampdown is Update 2.5's new prison-break side quest. Here's how to unlock it, get King's five-piece outfit and the Coronation revolver, and grab the bonus Disjunctor mod.

Update 2.5 added a lot to Night City, but the piece of new content most players want is Clampdown. It's a free side quest set just before the events of Cyberpunk: Edgerunners 2, and you spend it breaking a member of the merc King's crew out of prison. The payoff is King's full five-piece outfit and a new iconic weapon, the Coronation revolver. A bonus weapon mod shows up a day later if you know where to look.
This guide covers how to unlock the quest, every step inside the prison, the big choice, and the rewards. It applies to the current version of the game, Update 2.5 (the Edgerunners 2 Update).
What you need
| Quest | Clampdown (side job, Update 2.5) |
| Requirements | Finish The Heist, then complete two gigs for Wakako Okada |
| Starts at | BuryGer, near the MLK & Brandon fast travel point, Santo Domingo (Arroyo) |
| Boss | Darius Bale |
| Main rewards | Coronation (iconic Tech revolver), King gear set, about 7,000 eurodollars |
| Bonus reward | Disjunctor iconic weapon mod, delivered after the quest |
Any two of Wakako's Westbrook gigs work. Tyger and Vulture and We Have Your Wife are quick options. Once both are done, wait for a message from Wakako about King. If it doesn't arrive, skip some time or do other activities until it does.
How to start Clampdown
- Read Wakako's message to add Clampdown to your journal.
- Fast travel to MLK & Brandon in Santo Domingo, Arroyo, and walk to the BuryGer restaurant next to it.
- Sit at the marked table and wait. King calls and asks V to get his crewmate Miguel out of the prison across the street.
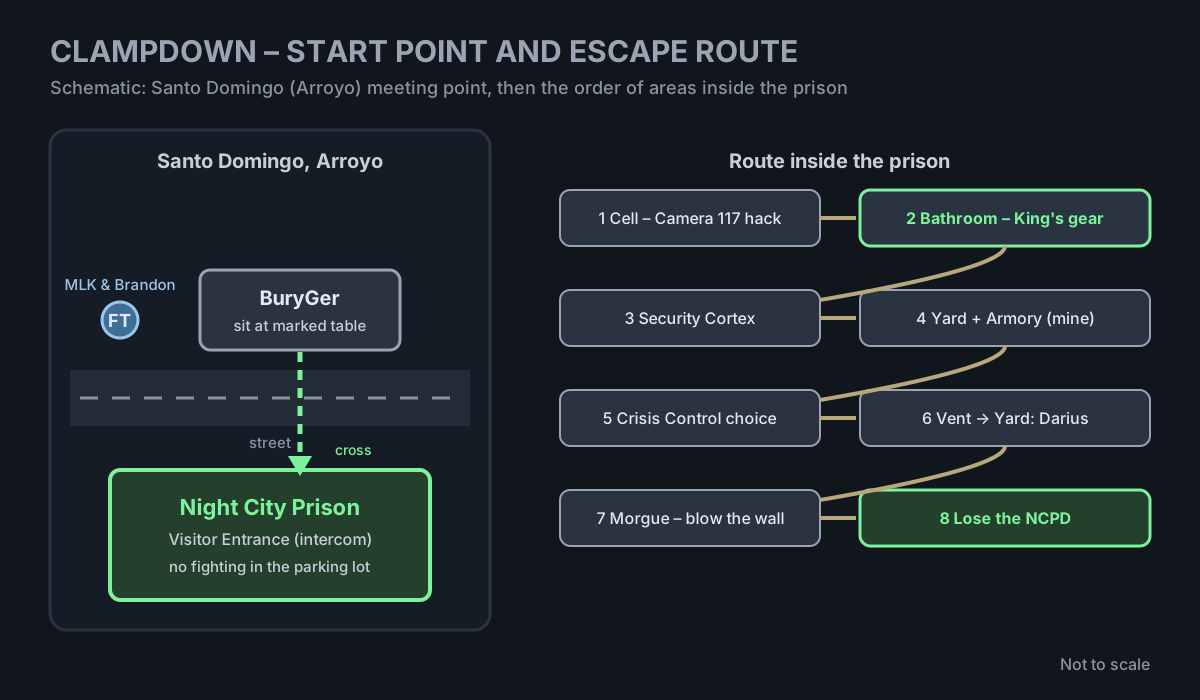
Clampdown walkthrough, step by step
- Go in through the Visitor Entrance. A gang hangs around the prison parking lot. Don't attack them, don't jump the fence and don't start a fight, or the quest fails. Use the intercom, follow the guard through security and put your hand on the scanner. V is knocked out. That's supposed to happen.
- Get out of your cell. You wake up next to your cellmate, Wex, and King's netrunner Meshuga gets in touch. Take control of the security camera, cycle through until you reach Camera 117 (Security Cortex), and remotely deactivate the door terminal.
- Grab King's gear. Head down the hallway to the bathroom at the end. Look for a yellow piece of clothing near a bench. A duffel bag under the bench holds King's outfit and the Coronation.
- Get an Access Badge. Take down the guards nearby and loot the badge from one of them.
- Hack the Security Cortex. Jack into the terminal and read the files on V, Miguel and Wex. That triggers the next objective.
- Disable the Reaper chips. Jack into the Reaper chip server and deactivate them in this order: your own first, then Wex's (optional), then Miguel's. If you want to help Wex, do his before Miguel's.
- Fight through the Yard to the Armory. Take the elevator to 01: Yard, clear the guards, then loot your locker in the Armory to get your own weapons and gear back. Take the explosive mine as well. You need it for the escape.
- Open the way to Crisis Control. If your build passes the attribute check, force the secured door near the Armory. If not, hack the terminal next to it. Ride up, clear the room and jack into the central Reaper server.
- Make the Crisis Control choice (see below).
- Crawl out through the vent. In the L-shaped room, open the vent marked in yellow and follow the shaft to a maintenance room. Raise the shutter to get back out to the Yard.
- Beat Darius Bale. He's in heavy armor, with a tough shield on his front. Keep moving, and shoot the fuel tank on his back whenever he turns. Shock damage and the Short Circuit quickhack work well. Loot his body for an Access Badge and a Perk Shard.
- Blow your way out. Use the badge to reach the Morgue. Place the mine on the marked back wall, take cover and set it off.
- Lose the NCPD. You come out with a heavy police response on your tail. Call a vehicle and drive until the wanted level clears. Calls from Meshuga and King then end the quest.
The Crisis Control choice: King or Meshuga?
At the central server, King and Meshuga want different things:
- Listen to King: deactivate the Reaper chips. The inmates riot, and the crew uses the chaos to slip out.
- Listen to Meshuga: activate the chips. That kills the prisoners and clears the path.
Either way, the quest continues and you keep the outfit and revolver. If you'd rather not massacre a prison block, siding with King is the obvious pick.
Rewards
| Item | Type |
|---|---|
| Coronation | Iconic Tech revolver |
| King's Coat | Outer torso |
| King's Bulletproof Vest | Inner torso |
| King's Glasses | Head |
| King's Pants | Legs |
| IconAmerica Dust Devil Utility Boots | Feet |
Completed playthroughs also report about 7,000 eurodollars at the end.
Don't miss the Disjunctor mod
About a day after the escape, you get a message from Miguel about a package. It's waiting at V's original apartment in Watson. Inside is Miguel's old Reaper chip, which King has turned into the Disjunctor, an iconic Tech weapon mod. Check near the apartment entrance, not just your stash.
Tips and common mistakes
- Coronation can't be dual-wielded. The Double Trouble perk only works with Power pistols and revolvers, and Coronation is a Tech weapon.
- Don't leave the Armory without the mine. The Morgue exit needs it.
- Save before entering the prison. Some players report the cell door getting stuck. Reloading a save from before the Visitor Entrance is the reliable fix.
- Keep the parking lot quiet. Fighting outside the prison fails the quest before it really starts.
- Use a Glamdoc afterward. King's coat looks even better with cyberware skins from Update 2.5's new Glamdoc shops.
More Cyberpunk 2077
-
 How to Get the Militech Apogee Sandevistan in Cyberpunk 2077: Level, Price and Ripperdocs (Update 2.5)7 Nov
-
How to Get Mantis Blades in Cyberpunk 2077: Ripperdocs, Tiers and Upgrades (Update 2.5)7 Nov
-
 Cyberpunk 2077 Update 2.5 Patch Notes: Clampdown Quest, Glamdocs, Console Mods and Hotfix 2.500.20030 Oct
-
How to Dual-Wield in Cyberpunk 2077: Unlock the Double Trouble Perk (Update 2.5)26 Oct
Sources
- Edgerunners 2 Update (2.5) patch notes (CD PROJEKT RED)
- Cyberpunk 2077: Clampdown Quest Walkthrough (KeenGamer)
- Cyberpunk 2077 Clampdown Quest Guide (Update 2.5) (Hold To Reset)
- Cyberpunk 2077: Clampdown Quest Walkthrough (Update 2.5) (Power Up Gaming)
- Cyberpunk 2077 Clampdown Quest: Unlock Requirements and King's Rewards (TheClick)
This article was written by AI (Claude) and checked against the sources above. Games are updated regularly, so details may change.