How to Get Moonveil in Elden Ring: Gael Tunnel Location and Magma Wyrm Guide
Moonveil is one of Elden Ring's most loved katanas. Here's where to find Gael Tunnel, how to reach the Magma Wyrm and what stats you need to wield it.

Few weapons in Elden Ring have the reputation of Moonveil. This glowing katana mixes fast slashes with blood loss and a ranged magic skill, and it has been a favorite of Dexterity/Intelligence builds since launch. The best part: you can get it fairly early, as soon as you're ready to brave the edge of Caelid.
Moonveil drops from the Magma Wyrm at the end of Gael Tunnel, a mine dungeon on the cliffs between Limgrave and Caelid. This guide covers the route, the dungeon and the boss. It's correct for the current version of the game (patch 1.17, released in August 2026), which made no changes to Moonveil, and it applies to every platform, including the Switch 2 Tarnished Edition.
Moonveil at a glance
| Weapon type | Katana |
| Requirements | 12 Strength, 18 Dexterity, 23 Intelligence |
| Base scaling | Strength E, Dexterity D, Intelligence C |
| Passive | Blood loss buildup (50) |
| Skill | Transient Moonlight (unique, can't be changed) |
| Upgrades | Somber Smithing Stones |
| Weight | 6.5 |
| Found | Dropped by the Magma Wyrm, Gael Tunnel (Caelid) |
You can pick it up at any level, but you'll need 23 Intelligence to use it properly, so plan your stats before you commit runes to it.
Step 1: Get to Rotview Balcony
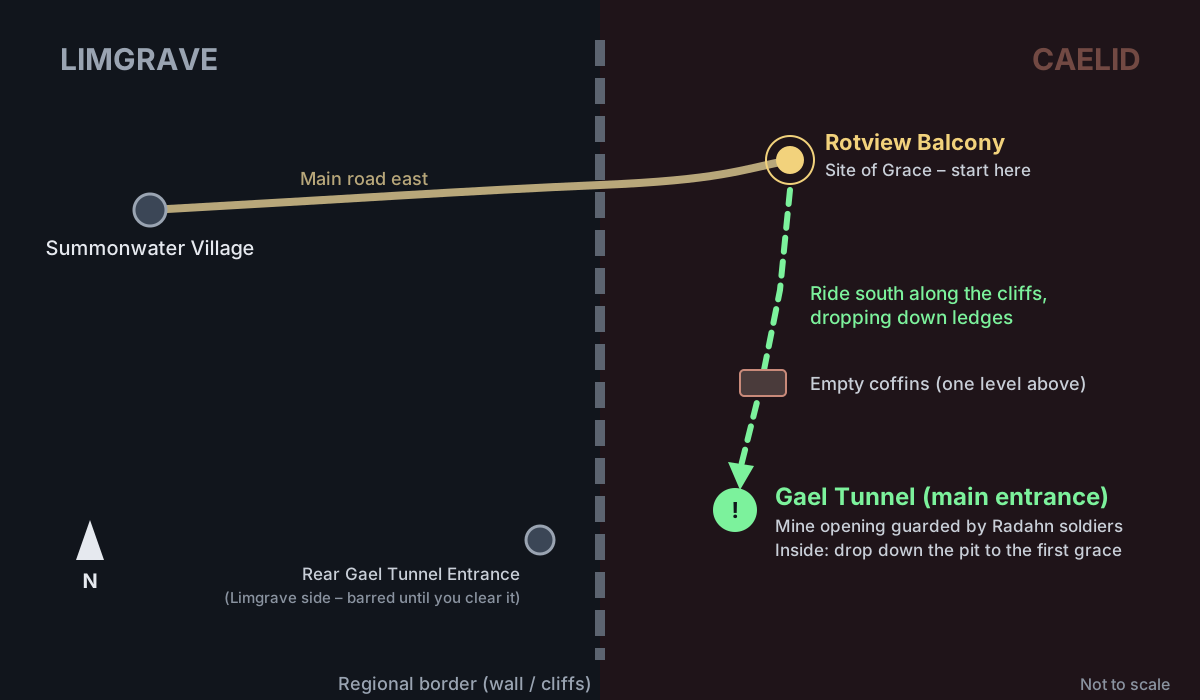
Gael Tunnel sits east of Summonwater Village and south of the Rotview Balcony Site of Grace, right on the Limgrave–Caelid border.
- From Summonwater Village in eastern Limgrave, follow the main road east until the ground turns red – you're entering Caelid.
- Keep following the road past the enemies until a charred wall blocks the way. Jump over it and head in to the Rotview Balcony Site of Grace.
- Rest there. If you die later, this is where you'll come back.
Step 2: Find the Gael Tunnel entrance
- From Rotview Balcony, ride south, following the cliffs and dropping down the ledges.
- Watch for a spot with empty coffins. The mine entrance is one level below them.
- Radahn soldiers guard the area around the entrance. Fight them or slip past – either works.
- Enter the mine opening. That's Gael Tunnel.
Step 3: Through the tunnel
There's no lift at the start, so you'll have to work your way down.
- Deal with the soldiers near the entrance, then drop down the wooden platforms along the side of the pit.
- At the bottom, activate the Gael Tunnel Site of Grace.
- Head north through the archway into a large cavern with wooden walkways. Clear the Radahn soldiers and the miners as you go – miners can drop Smithing Stones.
- Optional detour: the tunnels to the east lead to a cavern with Land Octopi and a Giant Land Octopus. The Cross-Naginata is on a corpse down there.
- From the main cavern, go west to a ladder. Look around nearby corpses for Large Glintstone Scraps – and be careful, there's a Grace Mimic in this area.
- Continue south toward the boss area.
Step 4: Unlock the shortcut before the boss
When you reach the room with the large wooden doors, don't go straight in.
- Open the smaller door opposite the boss gates first.
- Behind it is the Rear Gael Tunnel Entrance Site of Grace. Activate it – it puts a checkpoint right next to the boss and opens the Limgrave-side exit.
- Now open the large barricaded gates to fight the Magma Wyrm.
Step 5: Beat the Magma Wyrm
The Magma Wyrm is big and hits hard, but its attacks are slow and well telegraphed.
- Stay at its side or near its hind legs. Most of its fire and sword attacks are aimed forward, and it needs time to turn.
- Avoid the lava. Its magma breath and charges leave burning trails on the ground. Don't stand in them.
- Punish recoveries. After a missed swing or charge, it takes a moment to reset – that's your window.
- Use magic if you have it. The Wyrm is very vulnerable to magic, so sorceries help break its posture quickly.
- Go for the head when it falls. Once its posture breaks, run to its head for a critical hit.
Defeat it for 7,500 runes, a Dragon Heart and Moonveil.
Making the most of Moonveil
Transient Moonlight is what makes the weapon special. You sheathe the blade, then follow up with a light or heavy attack to draw it in a flash. Both versions fire a wave of light: the light attack sends a short horizontal arc, while the heavy attack sends a longer vertical one. It costs 15–20 FP per use, hits hard at range and can stagger many enemies.
Because Moonveil is a somber weapon, you can't apply Ashes of War, change its affinity or buff it with greases and spells. Instead, every upgrade improves its scaling, and fully upgraded it reaches B in both Dexterity and Intelligence. Keep an eye out for Somber Smithing Stones – there's a Somber Smithing Stone [2] in a small room in Gael Tunnel's pit.
Common mistakes
- Skipping the Rear Entrance grace. Without it, every failed attempt means a long run back through the tunnel.
- Fighting in front of the boss. The Wyrm's front is where all its damage is. Stay on its flanks.
- Wasting runes on Strength. Moonveil only needs 12 Strength. Dexterity and Intelligence are what scale its damage.
- Rushing in underleveled. Caelid enemies hit much harder than Limgrave's. If the soldiers at the entrance are shredding you, come back after a few more levels.
Sources
This article was written by AI (Claude) and checked against the sources above. Games are updated regularly, so details may change.